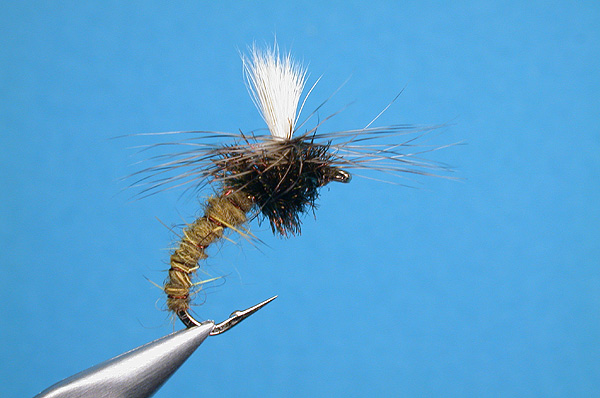
Grizzly Sledgehammer
(Materials are listed in the order in which they are tied in. Instructions assume a right handed tier.)
Background: The Sledgehammer is my variation on the Klinkhamer Special, a pattern by the Dutch tier Hans van Klinken. The K.S. is a quite popular fly especially in the Scandinavian countries and the British Isles, and making inroads into North America also.
Tying instructions:
- Attach thread behind eye, wind back 2/5 down the shank in touching turns, then forward to the 1/5 point. This will give a non-slip base for the wingpost.
- Cut a small amount of calf body hair and level the tips in a stacker. Using the pinch&loop method, tie in the calf body hair with the tips facing over the eye. Total length of the wing post is 2/3 hook shank.
- Lift up the post to a vertical position and fix it by wrapping turns of thread immediately in front of the tie-in point, effectively propping it up.
- Next make a number of turns circling the wing post base, laying the foundation for the parachute hackle which will be wound later on.
- Fill the 'drop' in front of the wing post with a very small amount of dubbing, so it is level with the tied down stubs behind the wing post.
- Cut the calf body hair stubs in stages, creating a tapered underbody. Wrap thread over stubs, ending well into the bend of the hook.
- Tie in the copper wire, dub a thin dubbing rope and form a slender, tapered abdomen, leaving 2/5 of the shank for the thorax.
- Counter wrap the abdomen with the copper wire in open spirals and tie off. Trim excess wire.
- Tie in 2 or 3 strands of peacock herl by their butts at the abdomen/thorax join, tips over bend of hook. Wrap thread forward until it is immediately behind the wing post.
- Prepare a grizzly hackle, one to two hooksizes larger than you would use for a this size. Strip fibers like you would do for a standard dry, then strip away a _few_ more fibers from one side. (If you look down on the feather, butt towards your body, tip away, shiny side on top, then strip these fibers from the right hand side of the stem) The reason for this extra fiber removal will become clear, once we start wrapping the hackle.
- Tie in the hackle immediately behind the wing post, tip facing over the bend of the hook. Make sure the hackle is laying horizontally, shiny side facing up. The hackle should be tied in by the butt, and in such a way that a small piece (some 3/32") of bare stem is visible before the hacklefibers start. Tie down the butt in front of the wing post until just behind the eye. Clip waste.
- Wrap peacock herl first behind, then in front of the wing post. Tie off and clip waste. (Keep hackle out of the way as you wrap the peacock)
- The parachute hackle is wound *down* the wing post. In order to do this we spiral the stem *up* the wing post first for a half turn. This is where the bare piece of stem helps, as there will be no wayward fibers obstructing procedures. Then as we start our first turn in a downward direction, the side which we stripped a bit more will be on the 'inside' of the stem, closest to the wing post. Again, because there are no fibers there a clean start can be made.
- Wind down the wing post in touching turns, some 4-5 turns in all. At the end of this come over the eye towards you and pull hackle tip down. Snake the thread over the hackle tip, yet under the wound hackle, over the eye to secure the hackle tip with two or three turns of thread. Clip hackle tip.
- Make an almost horizontal whip finish, avoid tying down any hackle fibers. Here I find a hand whip finish easily wins out over a whip finish tool. Clip thread and finish of with a touch of varnish on the head. Optionally, drop a small drop of thin varnish into the base of the wing post.