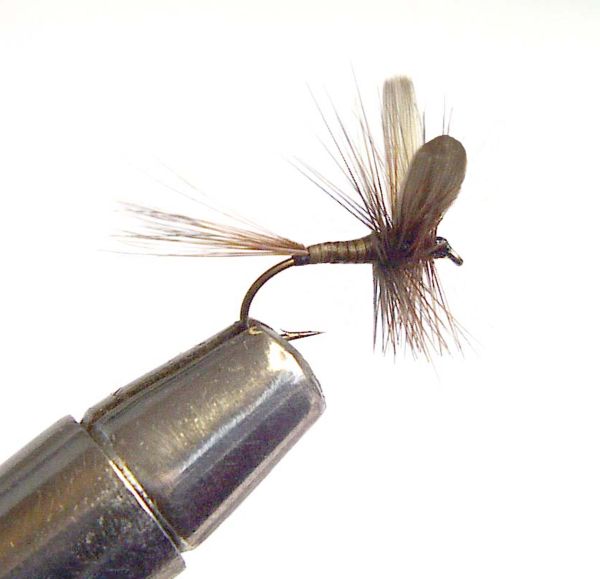
Dad's Favourite

Tying instructions:
Step by step photographs - John Morton
Place hook in the vice, holding the hook at its bend in the vice jaws and the point covered by the jaws.
*** The Underwrap ***
Starting 6mm back from the eye of the hook lay down a close wound bed of tying thread along the whole length of the hook as detailed in lesson one; to a point halfway between the hook point and the hook barb. Leave at least one millimeter of clear hook at the eye of the hook
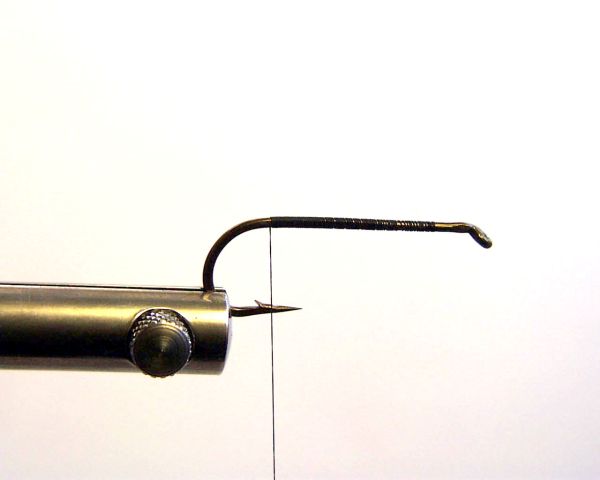
Make a small thread wraps bump where the tail fibers will be tied in. This allows the tail fibers to fan easily.
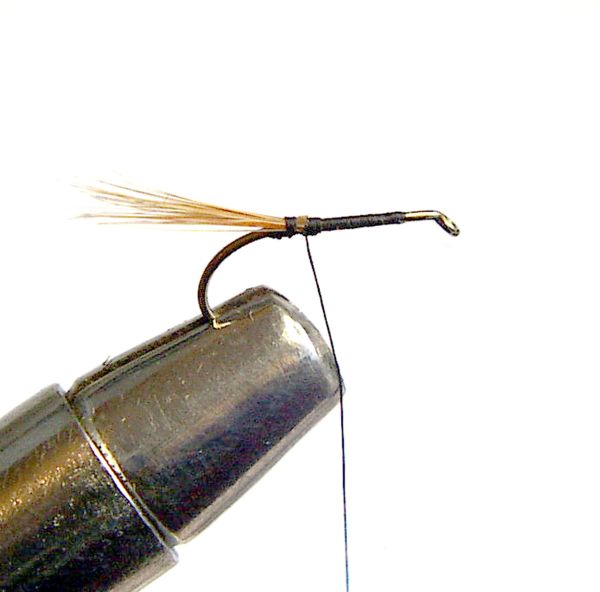
*** The Tail ***
From the side of the neck cape of a brown rooster, select a feather. These feathers on the side of the cape are stiffer than elsewhere on the cape and have little or no soft center web or `flue' as it is often referred to. In literature these feathers are often referred to as 'spade' hackles. Strip off some of the base, hold the feather by it's tip in your right hand, stroke the spicule’s rearward with your left hand to `open' the feather and pull off a pinch of feather with your left hand. Snip off the rough base where it has torn away from the central spine plus any soft basal flue if you didn't use a side cape feather and mount it on the hook with three fixing loops, allowing the tail to be equal to the length of the hook. Hold the tail fibers firmly in the left hand, and wind rearward to just at the base if the thread nodule. Release the left hand and make one more turn rearward into the base of the thread nodule. Watch the tail open and flare outward to provide a wide platform at the hook rear for stabilizing the fly when it is on the water If you have followed this instruction exactly as you have read it, then there will have been no need to change hands or turn the material over to achieve a position where it can be successfully applied to the hook. You r fly should now look like the picture, and be ready for mounting the quill body and front Hackles. This is the whole point of tuition by technique tying, and enables the tyer very quickly to attain `professional' status in the quality and appearance of their flies. Your fly should now look like the picture.
*** THE WING ***
I have seen many ways and methods used to wing a dry fly and all of these have depended on continuous practice to achieve a good pair of unsplit wings, sitting upright. The following method is almost foolproof, and ties perfect wings every time, for both beginner and advanced tyer alike.
Start with returning the thread to a position one third of the way along the hook shank from the hook eye. You can also, if tying a batch of flies and doing wings only, start with the first tying thread winds at the eye of the hook, winding back ten turns and then advancing three turns to achieve the correct position on the hook to mount the wings. This is where the first tie-down loop will be placed.
Preparation of the feather to be used and the right "dressing" of each wing is most important, and it is this care that will ensure that the wings you tie will look and sit well.
- Take a feather from the secondary flight feathers of a grey or mallard duck or drake wing. Remove one feather from a left and a right wing. The secondary wing feathers are the wide back feathers of a wing, found in the area past the first joint back from the wing tip. The end joint section holds the longer thinner feathers or `primaries'.
Wing feathers have top `shiny side', and a bottom `dull side'. To recognize a right wing from a left wing, hold the base of the feather with the shiny topside facing you. If the `wide' side of the feather is on the left as you look at the feather, it is from a left wing; if the wide side faces right, the feather is from a right wing. - Cut or pull off the base 12 to 20 mm at the base of the feather from the right wing and on the wide side of the feather. The next paragraph is most important that you follow the instruction with particular care.
- Hold the feather by the tip and in the right hand; hold it so that the wide side of the feather faces to your left. Using your left hand, slip your scissors or a needle into the base of the wide side to separate out from the main feather, a section for the wing.
The correct size of section to be separated from the main bulk of the feather should be the same width as the `bite' or gap between the hook point and the hook shank. At this point it is now necessary to "dress" the divided-out segment while it is still attached to the base of the quill. This "dressing" aligns all the individual tips of the segment so that all the points of the segment are equal lengths. - To do this "dressing", take the separated out segment in your right hand between the `ball' of the right thumb and forefinger.
Hold lightly, and using your left hand forefinger and thumb as was demonstrated, stroke the bunch along the axis of the feather firstly away from your body and then towards your body (i.e. `up and down').
Rather like riffling through the pages of a book, until all the individual points of the spicules lie level and any `break' in the feather segment has rejoined itself again. - When the feathers are prepared or "dressed" as described they are taken firmly in the left hand, while still maintaining a grip on the center quill of the feather with the right hand.
- Twist your left hand toward your body while holding the wing segment and then with a pushing away movement of your left hand the pressure being applied with your left thumb, "tear" the segment from the quill.
The two segments, one from each wing feather are fitted back to back so that the tips curl outward from each other and each set of tips are level in length. They are now ready to be tied on the hook.
If you are not prepared to carefully study and follow the above moves, your wings will not always be perfect.
*** MOUNTING THE WINGS. ***
The next stage is to hold in the left hand the feather wing butts in their back to back, outward curled position, with the tips exactly even with each other in length. Hold in the left hand and place the feathers over the hook for tying in, and lay them along the hook shank with the wing tips pointing forward over the hook eye.
The correct wing length is exactly equal to the whole hook length. The tie down position must be well covered by your left hand before the first fixing loop is made. Make this first tie down loop while holding the hook, feather wing sections, and thread all very firmly in the left hand.
Once this first loop is made, lift the thread and bobbin to a position directly above the hook. Then, and only then, open the left-hand finger and thumb by relaxing the left-hand grip slightly.
Move the right hand and bobbin approximately half an inch rearward before making the next turn of thread around the hook. This movement rearward is the most vital part of the winging process, as it clears the thread from catching the now positioned wings and thus rolling them off line.
Keep checking this point till it becomes a habit and you always do this.
Now, wind the second turn of thread tightly behind the first; move in a rearward direction on the hook.
Note: - This second wind is not a fixing loop. Keep winding another 10 turns or so in a rearward direction; --- hold up the feather wing butts with the left hand and snip off the excess material.
Wind a few neat turns over the trimmed butts to form a nice smooth taper to the body and return the tying thread to as close behind the wing as possible.
Drop the bobbin from your right hand and in the ball of flesh between your right thumb and forefinger. Grasp the wings and the hook so that they are held in the center of the ball of flesh. Hold tightly, and roll your right hand to a vertical position. This will lift the wings to an upright position rather like the opening of a door with your thumb and forefinger as the hinge.
Your right forefinger will be behind the hook shank, and will be supported against the hook shank and against your thumb on the other side of the hook shank.
Now: slide your right thumb vertically upward until it just clears the hook shank and you can see the wing root and the hook underneath it.
Remember, your forefinger is now the main support to your right hand and maintains it's position by using the hook shank it lies against as a brace to hold itself still and steady and maintain a constant upward pressure on the wings.

This upward pressure or pull should be such that you are starting to straighten the hook in the vice with the strength of the upward pull. At this point, pick the bobbin up in your left hand and swing the bobbin three times around the hook from back to front, (clockwise), like the top rotor movement of a helicopter blade. I.e.: horizontally around the wing root base.
This will position three turns of thread tightly against the wing roots that are being pulled strongly upwards, and fix forever their position on the hook.
Immediately after these last three horizontal turns of thread take two more `locking turns' around the hook from behind the wings in the normal manner before releasing the upward pull of the right hand. Your wings are now perfectly set and in position.
Separate the wing with a light flick of the finger against the rear of the wings, or use a needle. Holding the bobbin once again in the right hand, make one wrap up and over to the far side of the hook passing between the wings in the first wind of a figure eight tie.
The thread has just passed through the wings from back to front. Complete the wind and make a second wind through the wing, this time passing from front to rear. Repeat the sequence, and take the tying thread to the rear of the hook ready to mount the tail of the fly.
Congratulations, you have just mastered the so-called `difficult' art of winging a dry fly. Tie a few more wings to fix this lesson and the tying sequence in your head for all time.
Now, take the tying thread to the rear of the hook.

*** FLY BODY ***
Select a good full herl from just below the ring of the `eye' of an eyed peacock feather, and strip off the flue from the base of the herl by pulling the herl between thumbnail and ball of forefinger. Strip in small increment, scraping toward the butt of the quill. Do each side of the quill, until about two thirds of the quill is free from fibers.
Tie this herl in at the rear of the hook, by the butt and tie the butt down securely. Take the tying thread forward to a position 3mm behind the wing position. Select two hackle feathers from a good quality cape. Strip off the soft `flue' from the base. Lay the two feathers back to back and lay across the hook shank against the body thread.
Tie the hackle down exactly at about the 3mm position behind the wings and tie in the hackle roots by winding tightly and compactly rearward toward the tail. Snip off the hackle butts and build the underbody with the thread to a nice even tapered profile with as few winds as can be managed to achieve this nice shape.
Take the tying thread to a point exactly halfway between the front of the wings and the eye of the hook. There should be about two `hook eye lengths’ of space on the hook shank in front of the thread at this point providing the wings were tied accurately in position in the first place. This will be the area left to form the head of the fly.
Now wind in the stripped peacock herl for the fly body. Take it up to and past the hackle feather position, and wings. Tie it off and restore the tying thread to the 3mm position (two hook eye length’s) behind the hook eye.

*** WINDING THE HACKLE. ***
Take the very tip of the front hackle (nearest the wing), in the jaws of a pair of good quality hackle pliers.
Wind the hackle in tight even turns both behind and in front of the wings. Four to six winds on each side will be possible with a good quality hackle. When you have wound up to, but not beyond the tying thread, comb the wound hackle back with the left thumb and forefinger to leave the feather tip in the hackle pliers well exposed and tie off the tip tightly with four winds maximum.
Keep winds to a minimum, as you will be tightening down on these few fixing winds later on when building up the fly head. Snip off the unwanted tip as close to the thread as possible and leave a no poorly cut ends protruding over the eye. These ends are always harder to trim well, if a second cut is needed.
Wind down the second hackle giving attention to the area in front of the wing to ensure that there is sufficient hackle to cover any shortages you may have left after winding the first .
Tie in a neat head, trim off tying thread and apply a coating of thin glue to run well into the bindings. Finish with two coats of black lacquer.
At this point, remove the hook from the vice, and press your thumb firmly between the wings to set and cock them. Don’t fix with glue, as this will often harden the wing base too much, so that when the fly is cast, the wings act as a fixed propeller and can twist up a fine nylon leader.
Fluff up the hackle if it got squashed, and apply a coat of fly floatant. It is worthwhile doing this as the fly when wanted quickly, can be used straight away after being tied on, without the risk of spooking the trout while false casting to dry the fly before your first presentation is made.