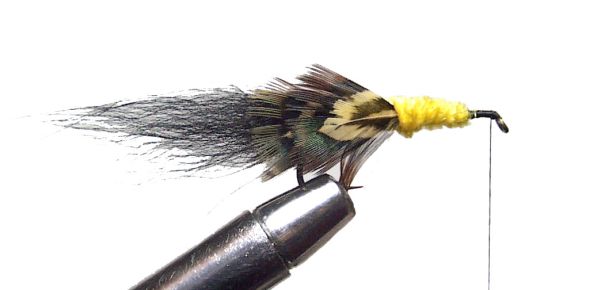
Mrs. Simpson
Tying instructions:
Step by step photographs - John Morton
Mrs. Simpson ("Killer" style)
Killer style flies are usually tied on hook sizes between #10 to #2 or larger.
*** The Underwrap ***
Starting two eye lengths back from the eye of the hook lay on a close wound bed of thread along whole length of the hook to a point above the halfway mark between the hook point and the barb. While winding, hold the short end of the thread taut at a rearward angle of about 60 degrees. This will pack each wind of thread to form a tight underbody that will not roll.
*** The Tail ***
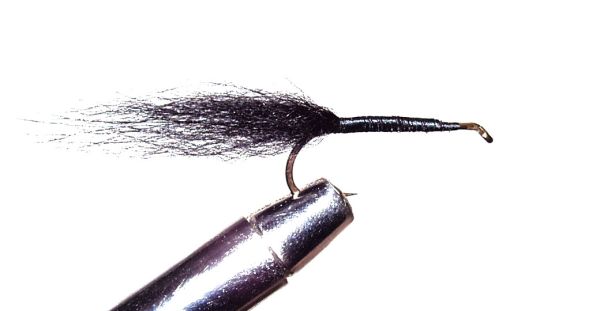
Select a bunch of fur from either a Black Squirrel Tail or a long fibered Opossum Tail, to approximately a half a pencil thickness. Hold this fur bunch by the tips and tease out all the underfur from the butt end of the clump of fur.
Measure the fur along the hook with the right hand to lie approximately one and a quarter hook lengths long. Change hands using the thumbnails as markers to maintain the fur tail proportion and then tie this fur bunch directly over the last underbody-tying wrap using three tie-down `fixing loops’. Wrap the butts with close tight winds along the hook and when three quarters along the hook shank toward the hook eye, trim off at an angle the remaining butts, and bind over these smoothly to form a taper. Under NO circumstances tie the tail into the area reserved at the hook front for the head finishing wraps.
Return the thread to the tail, lift the tail and roll it with a slight twist toward your body to tighten the bunch. Check under the tail to ensure that the fixing loops haven’t crept forward and left exposed the underbody thread wrap. If this has happened, wind tightly rearward with the tying thread until the thread lies exactly over the end of the underbody and the tail is fixed neatly on top of the hook at this position. You are now ready to tie in your pair of tail body feathers.
*** Rear Tail Feather Pair ***
From the lower body cape of a Cock Pheasant skin cape, select two feathers with a mottled semi-church window pattern arch. Do not use the heavily defined `Church Window’ feather toward the cape neck area as they are too stiff and will impede the natural swimming action of the finished fly, and also make it more difficult to achieve a nice `lie’ to the body feathers.
With the two small feathers selected from the rump of a ring-necked cock pheasant, strip off the soft fluffy flue from the base of each feather, and some of the feather spicules proper, to obtain small enough feathers. These feathers should be approximately two thirds smaller than the front body feathers.
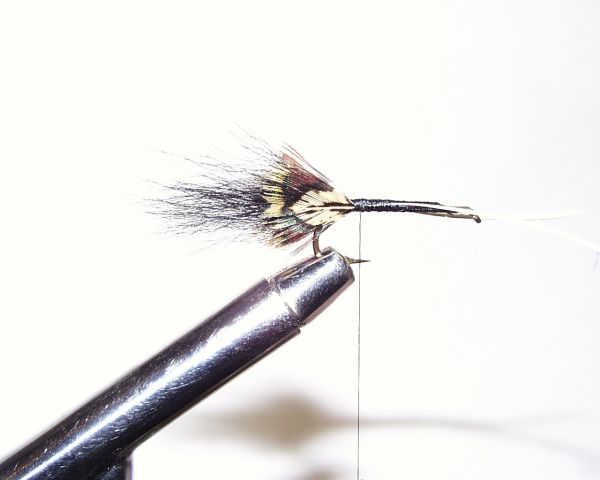
Hold the feather by the quill in the right hand, and lay it alongside the hook shank on the farthest side of the hook from you. Lock it in place with a forefinger of the left hand.
The tip of the feather should extend rearward and be placed to cover half the tail hair. If the feather is too big, unmount it; strip off more spicules until it meets this specification. See picture
When in place to your satisfaction, hold the feather firmly against the hook shank with the index finger of the left hand, and wind three medium firm loops, starting exactly at the junction of the spicules and quill center point and spiraling toward the hook eye.
Three winds should cover about 5mm. Now, return the tying thread to the rear of the hook with another three winds. Take the second feather and repeat the process against the side of the hook facing you. The feathers should have their natural curve facing inwards, and appearing to clasp the tail material. At this point, it is important to check that the feathers you have just mounted lie in the proper position as shown. If not, gently pull on the feather butt, (one at a time, starting with the feather furthest away from you) and check that they are both the same lengths.
*** The Body Chenille ***
Take a seven-centimeter piece of red, yellow or green chenille, and strip off the first 5mm of flue with the thumb and index finger of the right hand, to expose the center core of the Chenille. Mount the chenille over the hook with the left hand so the exposed center core points to the hook eye. Tie in with three fixing loops.
Check that the first fixing loops tie the chenille down exactly over the position of the first tail-fixing loop. Bind down the exposed Chenille core and return thread to the rear start point again. If the tie down loops have crept forward, Hold both the tail and the Chenille rearward and wind the tying thread rearward until both the tail, the chenille, and the tying thread lie exactly at the end of the thread underbody. To check this, lift the tail to see that there is no base tying thread showing under the tail. If there is, wrap a few more turns of tying thread rearward until the under body thread is completely covered.
Take the tying thread to halfway up the hook shank binding down firmly the tail feather butts, and then cut off the tail feather quill butts. For insurance, you can add a good touch of cement to the hook shank and wrapping between the tail and tying thread position. Wind the chenille forward toward the eye in tight wraps to the half way mark along the hook shank. Secure it with two turns of tying thread, attach the loose end in a pair of hackle pliers and allow the chenille to hang under the hook. Take two rearward winds back over the Chenille. You are now in the right position to mount the middle body feathers.

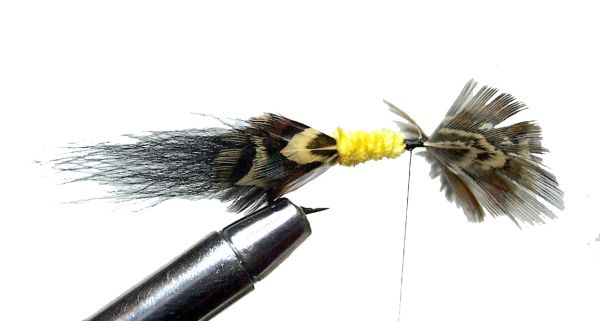
*** Middle Body Wing Feathers ***
Take a second pair of cock pheasant rump feathers, approximately one third larger than the tail pair and with similar marking pattern and again fix as described in the previous paragraph for the tail feathers. If the feathers don't lie properly or extend too far to the rear, pull on the butts of each feather in a straight line and parallel with the hook shank, towards the hook eye.
This will start pulling the spicules of the feather under the first tying thread wrap, and align the feathers so that they will sit properly. - It is most important to pull the feathers with the center quill lying along the side of the hook, and with the direction of the pull exactly in line with the hook shank.
If you pull the feather in any other direction than as described, the feather quill can slide under, or over the hook shank, and throw the feather off the correct mounting line. If this happens, then the feather needs to be taken off and the positioning and fixing process restarted.
Always mount both feathers before attempting the forward pull alignment technique, as these feathers help to support each other. This second pair of body feathers should half cover the previous (tail) pair, and be approximately a third bigger in size than the previous tail pair. See picture to right. When the middle or second pair of feathers have been positioned, wind tightly forward over the butts, tie off and snip away the excess quill butts. Bring the tying thread to 6mm (two eye lengths) behind the hook eye. Add a touch of cement to the hook shank and wrapping, then wind forward remaining Chenille.
Hold the second pair of wing feathers between the left-hand thumb and forefinger so they don't pull over sideways when wrapping chenille. A single gentle rearward wrap may be necessary to hold back the feathers if they flare out too much.
Wind the chenille forward in even wraps to a point in line with the tying thread position. (I.e. 6mm (two eye lengths) behind the hook eye).
To tie off the Chenille, release the left hand and then pick up the bobbin in the left hand to `throw' the bobbin three times over the hook with a pull tight on each turn. The chenille should be tied off whilst hanging below the hook shank. Do this by using the left hand to pull the tying thread out of the way and snip off the excess chenille from a point under the hook. Bind the loose end down and position the tying thread at a point hard behind the hook eye. You are now ready to mount the front shoulder `wing' feathers.
*** Mounting the Four Front Wing Feathers ***
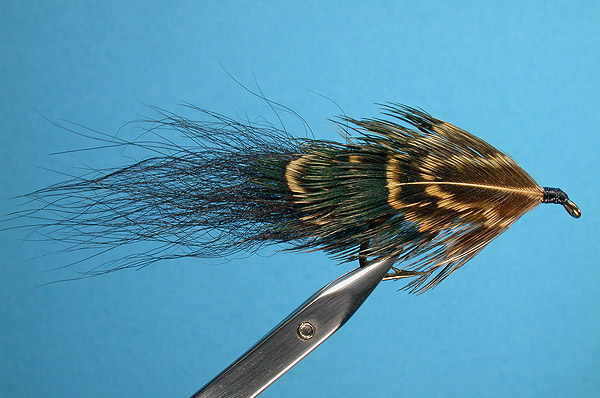
Prepare four more feathers by stripping off the soft flue at their bases. These shoulder feathers should be well-marked `church window' feathers from the middle of the rump of a cock pheasant. These feathers should be a third larger than the previous mid section pair, which in turn should have been a third larger than the tail pair. Gauged this way your proportions will always be correct. This time two feathers will be tied in on each side of the hook. Even the most experienced tiers have difficulty in getting the shoulder feathers to lie right and present a knife-edge on the top and bottom of the fly when finally placed.
The following method is failsafe. - Hold a pair of shoulder feathers by their butt quills in the left hand. With the tips of the first pair of feathers extending over the hook eye and curved away from you, hold this pair against the side of the hook furthest from you and make three winds, exactly at the eye of the hook and exactly at the point where the center quill and feather spicules meet.
The inside curve of the feather will be facing away from you. Tie the butts down hard over the 6mm space you have originally left at the hook eye, and trim off the excess butts. Repeat with the second pair of feathers on the near side of the hook. (Facing you). See Picture for correct position.
Carefully fold the far pair of feathers over (like closing a book); to lie against the hook and half covering the mid section feathers. Fix in position with two or three gentle, but none the less firm wrapping winds.
Repeat with the feathers on your side, (the near side) of the hook. If you have paid care and attention to the stripping of each of the pairs of body and wing feathers, this last lot of shoulder feathers should cover the previous (middle pair) by a half.
The shoulder wing feathers should lie perfectly with a knife-edge join at both the top and the base of the fly. Should there be any discrepancy in the wing position, the judicious use of the thumbnail over the butts and butt wraps can ease the feather lie to a more perfect setting.
Once aligned to your satisfaction, a firm, tight, built up head wrap can be made and the fly completed with a whip finish. Apply a coat of fly tying cement, which when dry can be covered with two coats of black head varnish. All killer flies are tied in this fashion.
Some have extra materials as ingredients as is shown in the pattern recipe for a Hamill’s Killer. If you are tying killer patterns on very long shank hooks it pays to add further body wing feathers, and adjust the feather sizes accordingly.
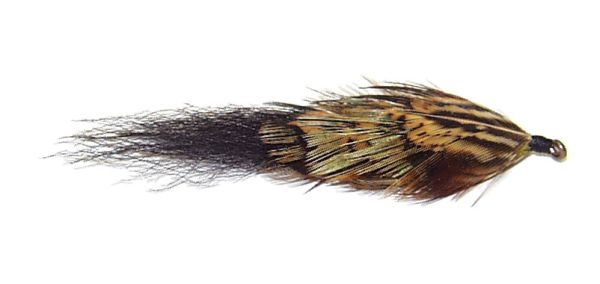
Your finished Mrs. Simpson should now look like this one shown. Note how each set of body wing feathers overlap the previous pair by a half.