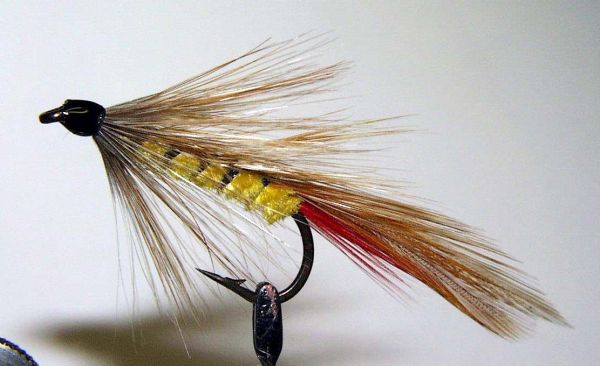
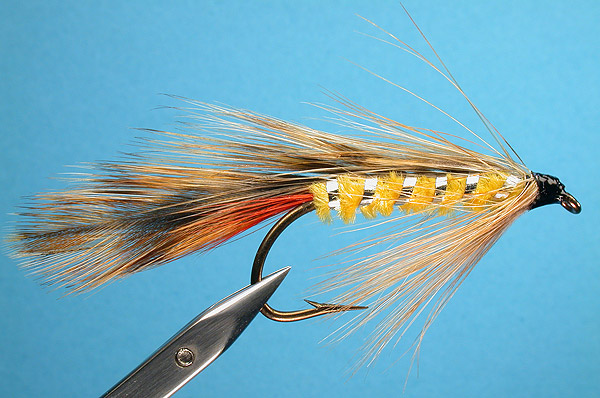
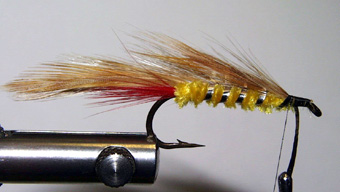
Parson's Glory
Tying instructions:
Step by step photographs - John Morton
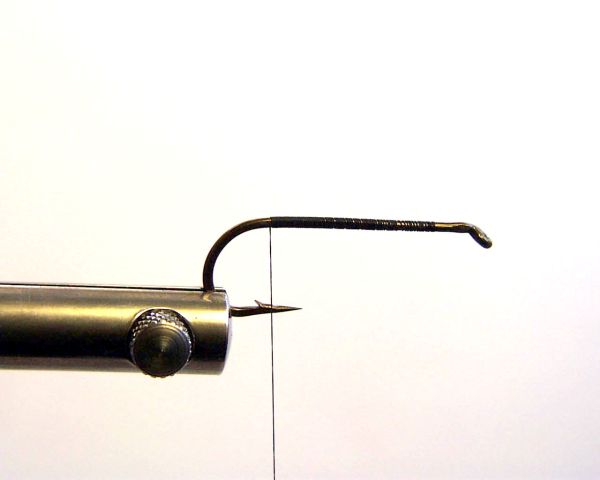
Place hook in the vice, holding the hook at its bend in the vice jaws and the point covered by the jaws.
Hook Size
Streamer Flies are usually tied on hook sizes between #8 to #2 or larger. The choice can be left to you. I prefer the medium size of #4 hook for my Streamer patterns with smaller flies for smaller waters, and large flies around #2 for night fishing or for heavy flows. Another rule of thumb is to use larger flies early in the season when the waters are traditionally higher, with more volume. Use smaller flies in low water summer conditions.
*** The Underwrap ***
At the front of the hook, observing the space reserved for the head tie area, lay on a close wound bed of thread along whole length of the hook to a point above the halfway mark between the hook point and the barb. While winding, hold the short end of the thread in the left hand; taut, and at a slight rearward angle. This will pack each wind of thread to form a tight underbody that will not roll. This is the basis of all flies you will tie. Thread underwrap finish point should lie ha halfway between hook point and the barb as shown
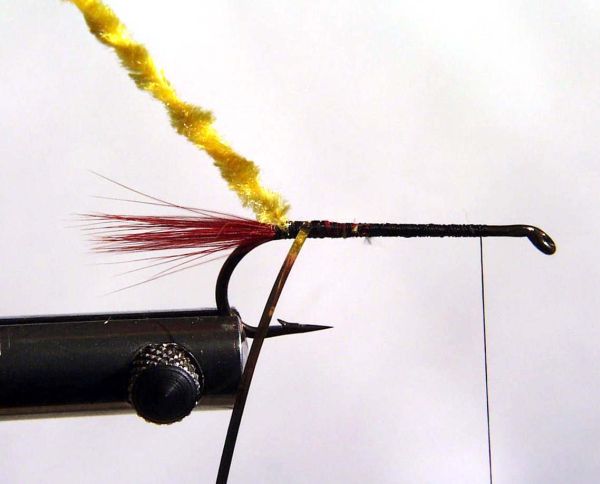
*** The Tail ***
Hold a dyed red rooster feather in the right hand, by its tip. Stroke this feather with the left hand to `stand out’ all the barbules at right angles to the center spine of the feather, strip off the soft flue base of the feather.
Take a quarter inch pinch of barbules between the thumb and forefinger of left hand, and tear off with a rearward movement. These spicules are to tie in as the tail material. For correct proportions the tail length should be the same length as the bed of thread along the shank of the hook. Fix the red barbule tail material over the last underwrap of thread with three `fixing loops’. Cut off the feather butts and wrap in butts firmly. Return thread to the rear of the hook to lie over the last underwrap, thoroughly and firmly tying down the butts of the red feather spicules. If you lift the tail at this point you should not be able to see any black tying thread showing under the tail. If you can, gather the spicule’s in your left hand and wind a few more rearward turns to place the thread in the right position for the next move.
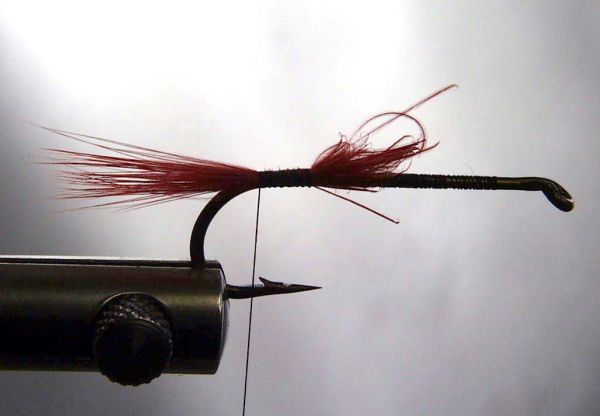
*** RIB and BODY ***
Take a five-centimeter piece of yellow chenille and strip a quarter inch of chenille away, to expose the twin cotton center core.
Tie in this center core directly over the first tie down wrap at the start of the tail.
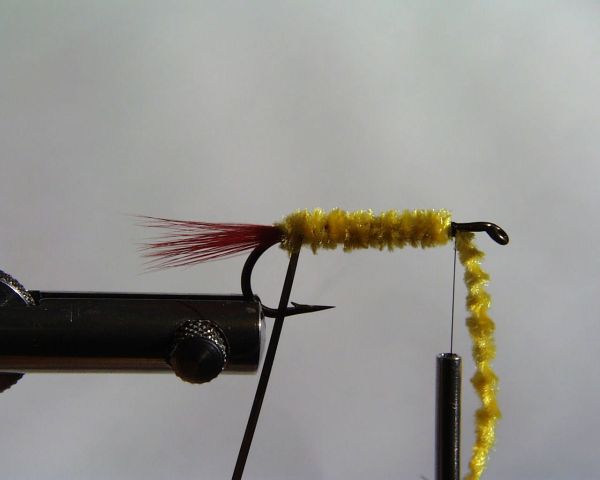
Tie in a five-centimeter strip of oval tinsel with three `fixing loops’, about a millimeter in front of the chenille.
Tie in chenille and tinsel butts firmly, and advance thread to the eye of the hook.
Apply a liberal coat of cement over this wrapping for extra strength and wind the chenille to the hook eye, using tight, closely wound wraps.
Use either your fingers or hackle pliers for this. Tie off, and clip away excess material. Remember not to move into your reserved head area at this point with anything other than tying thread
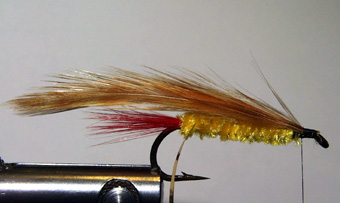
Take four honey grizzle feathers and place together two feathers for each side of the wing (four feathers in all), so the concave (curved) side of each pair of the feather’s lie facing together, with the tips all meeting together. The wings are then mounted over the hook using the right hand to measure the wings for size. The correct proportion is two shank lengths of the feather extending rearward from the tie in point, or to put it another way a tail length beyond the fly tail.
Clip off the surplus feather, hold the wing group by the tips and strip out all loose spicule’s at the butt ends you have just cut, and align all wing feather center spines so the wings all lie together in a straight line with the tips facing rearward. Take the wings in the left hand and place in position over the reserved head area to tie onto hook with the first `fixing loop’ tying down at the rear of the space left at the hook eye.
If the feathers are properly positioned, the ends of the butts should not obscure the hook eye. If badly positioned and the butts do extend over the eye, then trim off excess butts, and bind down neatly to form the start of a good flat head taper.
Finishing the rest of the Wing, and Rib with Tinsel
Return the tying thread to the start point of where the wings were tied in, binding down the wing butts. We now wind in the tinsel. Take one wrap of the tinsel round the hook shank, over the tail and bring it up into the chenille bed. The tail of your fly will stay in position with the feathers correctly aligned if your first rib tie-down is bedded in the chenille body.
Leave the tinsel to hang underneath the hook shank attached to a pair of hackle pliers. It is most important to take care with this last move, or the wings will not lie along the hook shank properly when bound down.
To effect the ribbing, stroke the wing feather tips together neatly to align them before grasping them firmly at their very tips with the left hand. With the right index finger in the eye of the hackle pliers, pull the tinsel up vertically and keep it taught. Adjust the distance between hackle pliers and top of the hook if necessary so that the thumb and third finger of the right hand can reach down comfortably to work with the wing. Stroke the wing feather spicule’s forward with the thumb and third finger of the right hand to make an opening in the feather wing. This opening should be exactly at the point where the vertically held tinsel touches the wing.
With the left hand holding the tips of the wing pulled tightly rearward, move the right hand slightly away from you so that the tinsel passes through the opening just made by the thumb and third finger. Release the thumb and third finger of the right hand.
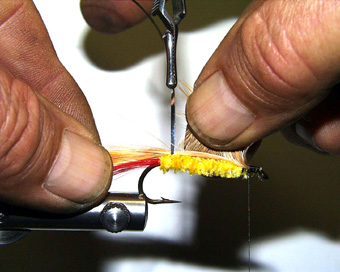
Now, release the left hand holding the wing tips, move this hand forward to the tinsel for the next move. To rib the wing properly, carefully comb the opening that the tinsel has passed through, back to its original position using the left-hand index finger and thumb. Now ..... Grip the feather wing, the hook and the tinsel between the left hand thumb and forefinger to cover the tinsel. Lock your left hand in this position so that nothing moves. With the right hand, pull the tinsel straight down behind the hook. Your first bind down of the wing feather is now complete. Do not spiral the tinsel forward while pulling it over and down; do not loosen the left-hand grip. When the right hand has pulled the tinsel tightly downwards, with the left hand locked in position holding the wing on top of the hook, then, and only then, advance the right hand forward slightly to advance the tinsel position. Each wind of the tinsel will repeat the last move.
The important thing to remember is that the tinsel MUST be passed over the hook in each successive wind at right angles to the hook while having strong tension applied. Good hackle pliers in this maneuver should not slip if correctly set. The spiral effect of the tinsel is achieved when the right hand is advanced forward at the very bottom of each wind over the hook. Repeat this last motion to put three to four tinsel wraps around the hook and through the feather wings, advancing with evenly spaced wraps toward the hook eye. Tie off the tinsel, cut off the end and bind down neatly. Return thread to the rear of the head taper where the tinsel and chenille were tied off. Three or four passes of the tinsel through the wing is enough to wind most tinsel bodies on a standard length hook.
Collar Hackle
Take a large, wide spiculed, soft honey grizzle hackle. Strip off the flue base and comb all the remaining spicule’s rearward. Tie in the tip of the feather very tightly. At the rear of the space reserved for the head. Snip off the excess feather tip protruding over the eye, advance the thread to right behind the hook eye and then hold the feather vertically above the hook. The feather should lie at right angles to the hook with the right hand gripping the stripped butt of the feather, and the `shiny’ or front side of the feather facing the hook eye.
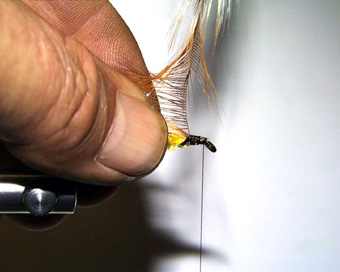
With the left thumb and forefinger stroke the hackle spicule’s rearward. Take a wind of hackle round the hook shank, comb more feather rearward. Take another hackle wrap around the hook close in front of, and toward the hook eye the first and repeat until at least three quarters of the feather has been used, or the center spine of the feather is hard behind the eye of the hook. Make two or three firm tie down wraps with the tying thread, cut off the butt of the hackle feather.
The Fly Head and Whip Finish
Wind a neat small head, apply a whip finish and snip off the tying thread as close to the fly head as possible. Apply clear cement; allow drying and then applying two coats of black lacquer head finish paint to form a smooth shiny head. It is most important to strictly adhere to the details of the process, as these details are the result of many years’ research to find the best method and technique to ensure that every fly tied will be perfect.