House fly
Tying instructions:
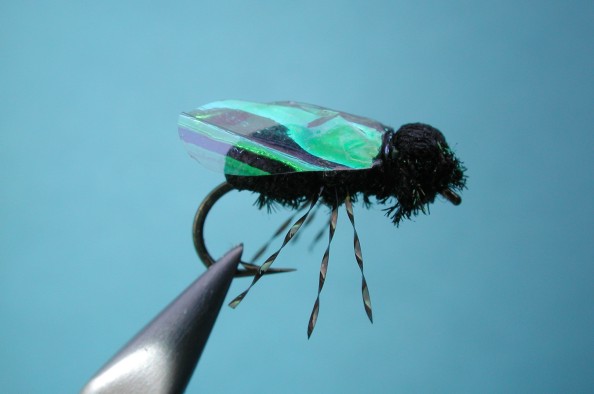
- Cut a piece of about 1/4 by 2 inch 1/8 inch thick blackcraft foam. Tie thread to hook and beginning at the hook eye, bind the craft foam down with the
foam pointing toward the tail. Tie down tightly to the bend of the hook I put a bit of head cement on the hook as well as it is VERY IMPORTANT that the foam will not twist on the hook.
- Tie on 3 pieces of peacock herl and use as a herl rope. Do not ever cut this herl
rope off until I tell you to do so as it is carried along under the fly the entire length of the fly.
- Spin the vise and wind the rope a little over 1/3 of the distance of the fly body and tie down, but do not cut off.
- Bring the foam over the back and tie down with several winds of thread. It should stick up and look like the back of the butt of the fly. Take one strand of Krystal flash and wind it around your index and next finger so that it is divided in thirds. Tie this down in the middle of the loop so that there will be three legs sticking out on each side. Leave the loops (it is easier to keep the legs out if you do not cut them to length now.)
- Bring the herl rope forward again about 2 the distance that is now left. Be sure to leave that last 2 as you need it for the fly head.
- Tie down the herl rope. Now again bring forward the foam and tie down. Tie it down now very tightly the rest of the distance to behind the hook eye. Move bobbin back and wind the herl rope again and wind forward. This herl rope is under the last piece of foam which will be brought back to form the head. Tie down the herl rope and now you can cut the herl off.
- Bring the foam back toward the bend of the hook and tie it down. This now makes the head. If it is done right, there should be three distinct segments to your fly.
- Now cut a piece of plastic bag or holographic paper twist to resemble a rather flattened heart shape. (I use a wing cutter from John Foust) It needs to be long enough to bend back on itself to form the wing. Measure it for length, with the wing v in the top of the heart just coming to the butt of the fly. Mark it with your fingernail so you will know at the front where to tie it in to bend it back.
- Tie in now with the v of the heart behind the head of the fly but with the broad part of the heart pointed over the eye of the hook Be sure that you catch the wing so that it is toward the hook eye ahead of where you cut off the foam so that it somewhat covers this. Bind it down tightly. Flip the wing over so that it is now going correctly over the back of the fly and place a bit of head cement on the body so that the wing will touch that cement as you push it into position. Tie it down with several turns of thread and whip finish the thread off at this tie in point..Do not try and bring the thread to the hook eye..tie it off here as it ties down the wing.
- Trim the legs to correct length (1/2 gap). Fish.. This also works great as a floating ant pattern.