Whopper
This fly developed out of what I felt to be a need for a hopper pattern that better imitated the shape and color of a struggling (or perhaps not) grasshopper in/on the water from the fish's point of view. Several prerequisites went into its development. First and foremost it must have the proper silhouette and color, both of which easily altered, to some degree. It should be tied aerodynamically to avoid leader twist as well as drag. It needed to be able to land gently or with a dramatic "splat" depending upon the situation. It should have a texture similar to a real grasshopper. It ultimately must prove to be durable while still being fairly quick and simple to tie, and be constructed from easily obtainable materials. None of the flies I had seen before incorporated all of these factors to my satisfaction.
The fly first began to take shape in the late 1970's. It was influenced by numerous other tiers work, but especially the Henry's Fork Hopper. Though from the beginning the fly has had its present silhouette, the materials have been refined over the years. Its present configuration has remained constant for about five years.
Evazote Preparation: Dyeing the Evazote is easy and provides a more exact color to the natural insect. Most predyed foam materials close to the desired color are yellow. Some grasshoppers do have distinct yellow underbellies, but the majority where I fish do not. A moderately safe color is simply Rit tan, with a contrasting edge color (using a permanent felt marker as described below) to enhance the segmentation. (Interesting hues of color can be achieved when using powdered dyes by sprinkling another color(s) of dye over the sheet while in the primary dye bath.) When dyeing the foam, place the whole sheet in a dye bath not exceeding 140 degrees Fahrenheit so that the foam does not shrink or shrivel. After dyeing, cut the foam into strips about 4 millimeters wide. This can be done on a smooth surface such as wood or glass with a metal straight edge and a razor blade.The dye does not penetrate the foam well, so unless the foam is cut up into strips prior to dyeing, the edges will be white. Color what will ultimately be the trailing edge of the strip with a contrasting colored (usually brown) permanent felt marker. Immediately wipe off most of the ink with a tissue. This helps to blend the ink into the dyed color and make it a bit less striking. If little enhancement of segmentation is desired, dye the strips after cutting them to size so that the edges are also colored.
The same segmented body appearance can be achieved with permanent felt markers by first winding undyed (white) Evazote, followed by marking the contrast color from hook bend to eye, then marking the primary color over that from eye to bend. The latter step removes some of the contrast color except on the edge of the foam. It must be noted that with this method comes some disadvantages such as, 1) the foam tends to shrink after the felt marker ink is applied, and 2) the ink will fade after just a few fish landed which then requires reapplication over a fly that you want to be fishing with rather than fiddling with.
Note: The following instructions are quite extensive for a fly that is not terribly complex. The reason for such complete instructions is that my purpose is not only to describe tying this fly, but also to include possibly unique insights and/or techniques that the reader may find applicable in other flies tied. Therefore the more novice tier should not be deterred from attempting the Whopper. Beyond the basic steps, glean from it what you wish that may prove of benefit to your tying style.
- Place a layer of thread over the entire hook shank beginning at the
back, ending at the eye. This layer provides a friction point for what is
to come later. Build up a small "ball" of thread at the base of the eye,
then let the bobbin holder hang down from this point. Coat this thread
base with glue.
- Select an appropriate color of elk or deer hair to match the underside
color of the natural. (I usually prefer to use elk due to its superior
durability.) Cut out enough hair so that when cleaned of underfur and
stacked to even the tips, the resulting bundle in diameter is equivalent
to approximately the gape of the hook. With the tips even with the eye,
hold the hair at the point equal to or slightly less than the length of
the hook shank. Now move the bundle forward with the tips extending beyond
the eye the measured length. Wind two or three just snug wraps of thread
and pull up. (Pulling the thread up pulls the material down onto the hook.
Pulling down pulls the hair around the far side of the hook.) While still
holding the hair butts, with the fingers of your bobbin hand rock the
bundle of hair side to side so that some is shifted on either side under
the hook. (If the first two or three warps had been tight, this
manipulation would not have been possible.) The majority of hair should
remain above the hook to help maintain the hook gape. Now wind several
tight wraps over the original snug wraps to lock the hair immediately
behind the ball of thread at the eye. If antennae are desired, now tie in
two elk neck hairs extending beyond the hook eye about twice as long as
the tips of the "head" hair, one on either side of top center. Hold all of
the hair butts parallel to the top of the shank, and guide the thread so
that in one wrap it is placed 3-5 millimeters toward the bend (which
determines the size of the hopper's head). Place several tight adjacent
wraps proceeding to the bend over a space of about 1.5-2 millimeters. This
provides the foundation for the underwing, overwing, legs, and whip
finish, while beginning to shape the head. It is important that these
wraps be even over this small segment and very tight so that the hair
cannot twist. Still holding the hair butts, spiral the thread toward the
bend compressing the hair so that it is "bubbled." Finish with 3-4 tight
wraps over themselves just short of the end of the shank, and cut off the
remaining hair butts. Very little hair should be below the hook shank.
Coat the entire shank with a penetrating layer of glue.
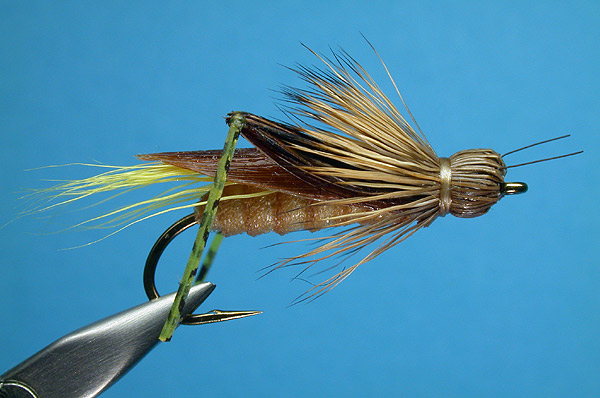
- With the darker edge trailing, tie a dyed strip of Evazote just to the
rear of the trimmed hair butts. While attempting to maintain the "bubbled"
effect of the hair underbody, spiral the thread back to the foundation.
Under moderate tension, wind the foam in even, slightly overlapping wraps
ending at the front of the foundation. Wrapping tightly collapses the foam
destroying its flotation. Wrapping too loosely results in a fly that will
not hold up well after a fish or two.Tie down with the waste stub on top,
stretch the waste piece, and trim off.
- Move the thread to just behind the hook eye. Roughly align the tips of
about 15 underwing hairs. Cut the hairs to a length so that the butts are
just behind the hook eye and the tips extend slightly beyond the bend. Now
position the trimmed butts approximately parallel with the hook eye and
secure with a couple of tight wraps. (A common problem occurs when firm
pressure is applied to a material. The friction of the thread will pull
the material several degrees out of alignment away its from intended
position. Tight thread which creates this problem is necessary because as
the thread is brought up and over the material, anything less than a firm
wrap will form a thread loop that migrates toward the eye and [in this
case] off of the material. This occurs because of twist in the thread that
is created naturally when tying. A solution might be to use a soft-capture
loop of thread and then pull up so that the material pulls down. Another
option involves simply twisting the thread in a direction so that a loop
of thread is thrown back toward the fingers holding the material. For the
right hand tier this means twisting the bobbin holder anticlockwise [when
viewed from above with the bobbin holder hanging beneath the shank] with
the opposite direction of twist being appropriate for the left hand tier.
When moderately light pressure is applied to lift the thread over the
shank, the thread now loops naturally toward the hook bend slightly beyond
proper placement. Continue this wrap on around the shank, and then pull
straight up. As the thread goes up, the loop slides forward exactly into
proper placement on the material. In this case repeat once more to secure
the underwing hair butts.) In one wrap move the thread back to the
foundation and secure the underwing with 3-4 more wraps. These two
sections of wraps 1) prevent the hair from twisting and 2) help form the
forehead protrusion that is often prominent on hoppers. (When wrapping
over the foundation, care to disperse the wraps evenly over each material
will help build a secure foundation for each item to be added later, as
well as lock each material in place. Slightly separated wraps often are of
more structural security than several wraps on top of one another.)
- Next lay the overwing above and around the sides of the Evazote
extending to the end of the body capturing the underwing. (When viewed
from below, the prominent features of a natural grasshopper captured in
the water meniscus include the abdomen, sprawled leg(s), head, sometimes a
partially unfolded wing, and antennae, but not a long overwing as is often
tied on hopper patterns.) Tie down at the foundation with 2-3 wraps. In
one wrap move the thread to just behind the eye, make 2-3 firm wraps, and
in one more wrap move the thread back to the foundation again. Fold the
waste end of the overwing back, tie off over the foundation, and trim off
the residual. This continues to build up the forehead of the hopper as
well as lock the overwing.
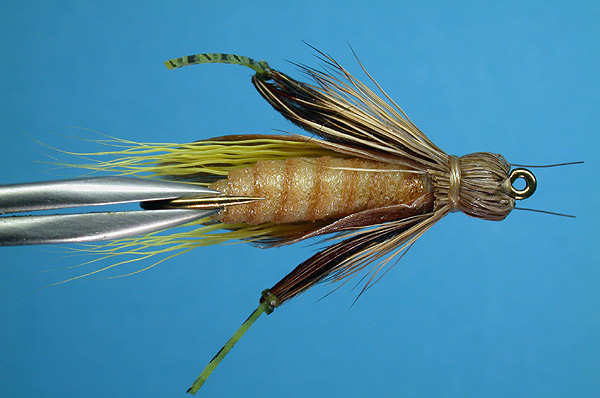
- The "kicker" legs are formed by a simple overhand knot. Even the tips
of about a dozen pheasant tail barbs and strip them from the rachis. Wet
the barbs to keep them together. (Saliva works better than water, but be
sure the feather is thoroughly washed before "licking!") Make a simple
loop of the barbs over themselves. With a crochet hook or, as I prefer,
the tip of a Thompson Whip Finish tool, reach through the loop and flip
the barb tips back up through the loop. Snub the knot to form a bent joint
in the leg. A lesser angle can be achieved by pulling on the tips and the
butts at the same time. A greater angle can be achieved by pulling from
the knot and the tip, and then from the knot and the butts. (I was first
introduced to this type of hopper leg over twenty years ago when I was
shown a hopper tied by Dick Alf. I have no idea who originated the idea,
but I must give credit to Mr. Alf. If desired, one can make right and left
legs by tying right and left overhand knots.)
- Tie a leg onto each side of the abdomen at the foundation with 3-4
adjacent tight wraps. Position the legs so that they protrude 10-15
degrees away from the body, jointed knees slightly in and tips slightly
out. This helps to maintain the aerodynamics of the fly as well as place
the legs into a more natural position of a grasshopper on/in the water. If
the legs protrude radically or are not even, the fly will twist when cast.
(Note: If the foundation has been firmly wrapped up to this point, when
tied in, the legs will protrude the desired amount outward due to the
width of the body immediately behind the foundation. If the foam has been
wrapped too loosely, or the foundation is too narrow, the legs will set
outward at an extreme angle. If the prior thread wraps making up the
foundation have not been tightly wrapped to this point, when tied in, the
feather barbs making up the leg will sink deeply into the foundation, thus
forcing them out just as deer hair is when compressed.) To really lock the
legs in place, loop the thread to the base of the eye, and make an
additional 2-3 wraps over the leg butts before trimming. If you do, be
careful to trim the leg butts without also cutting some of the head hair.
Now loop the thread back to the foundation. A third safeguard would be to
include the steps of the second option, but rather than trimming at the
eye, fold the leg butts back to the foundation, secure there a second
time, and trim off. This follows the same approach as with the overwing,
but consider that most hoppers have a fairly narrow head, and by adding
this step with the leg butts the head will be widened. Place a layer of
penetrating glue over the foundation where the legs, underwing, and
overwing are tied in.
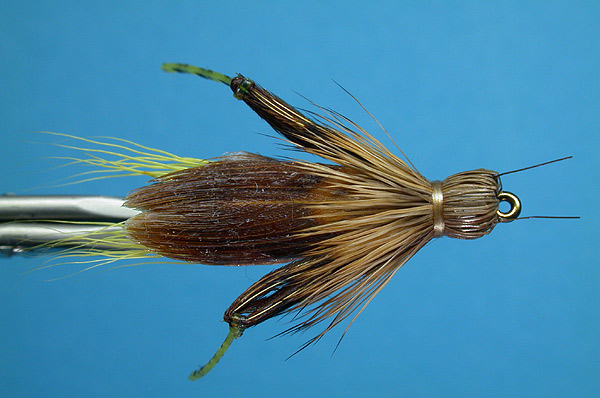
- With your fingers, press back the head hair 90 degrees toward the body
being careful to keep the antennae (if present) extending forward. A soda
straw or similar tool is useful in pushing the head into final position.
(An excellent tool commercially available is the Dyna-King Delrin Hair
Packer, Jumbo size. The smaller of the two hole sizes is about right for
Whoppers.) To keep them from being folded back with the head hair, insert
the antennae into the straw before pressing back with the straw the hair
tips so that they surround the foundation. Hold the hair in place while
the straw is removed and look to see that the hair is evenly molded around
the head area. Wind 2-3 soft wraps of thread. With the bobbin holder
hanging, press the hairs smoothly toward the bend so that the hopper head
is shaped. Hold the tips of the hair while several firm wraps are made
around the foundation flaring the hair tips out "Muddler" fashion. Tie off
at the foundation with a whip finish of 3-4 wraps followed by a second
whip finish forming a narrow collar. Take the fly out of the vise and trim
the bottom quarter of the head hair tips to open up a view of the abdomen
for the fish. The hairs to the side will represent the front legs. Trim
the antennae to length. (Most hoppers have short antennae. Always use
fine, flexible materials when tying a fly with antennae, especially long
antennae such as found on a cricket, caddis, or beetle. Otherwise you will
have to deal with leader twist.) Coat the head with glue and set aside to
dry.
Try chumming with grasshoppers some time and observe what they look like and how they act after they land. Note that they do not sit on top of the water, but rather in it. Most of the time they struggle a bit with "kicker" legs all askew. In short order they may become quite calm, but with the legs still out of normal body position. Note how the current plays on them, whether in pockets, foam slicks or riffles, as well as around boulders where they will often sink.
Typical presentation is on a leader of about 9' and 3x-4x since most often hoppers patterns are fished on windy afternoons. I prefer to "splat" my flies over a suspected fish's lair. Sometimes for excitement I like to aim the fly at the tail of the fish. This either elicits an horrendous take or one very excited exit. Sometimes on less windy days, and thus, in calmer water a more gentle approach is appropriate such as presenting the fly well upstream of the fish and dead drifting it down. As the fly approaches the fish, a tap of the rod butt may create just the right vibration to the fly to get the fish interested. Occasionally I will resort to the cast-onto-the-grass technique, slipping the fly onto the water with a gentle "plip!" Do not ignore the possibility of hoppers when lake fishing. Also do not ignore a sunken hopper. An exceptional place for a sunken hopper is around boulders out in the river. Generally thoughts of hopper fishing are associated with cut banks and tight casts, but wind will carry a flying hopper amazing distances to the middle of some broad rivers.
I generally do not fish the Whopper until early afternoon when a breeze begins, but I might add that the largest brown trout I have landed on the Whopper was at 10:00 in the morning.